Continuing with pushing game type ideas to the masses, we have a new post today to demonstrate a simplistic game for players of all ages and experience levels regardless of the replica you may be able to acquire.
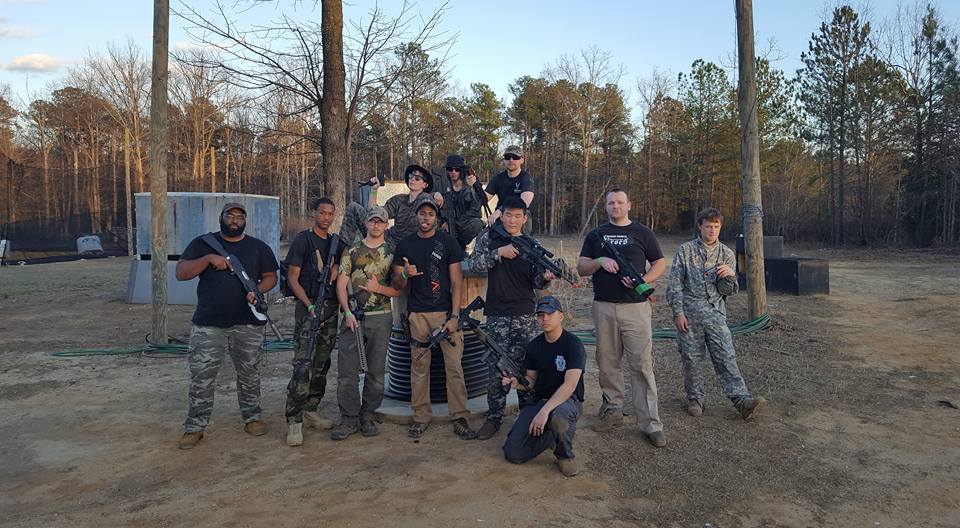
TK with a group of guys for a day of games at VA local field, XZONE!
As always, these game types are just basic suggestions and you and your friends can tailor each game play idea to create it your own. (more…)
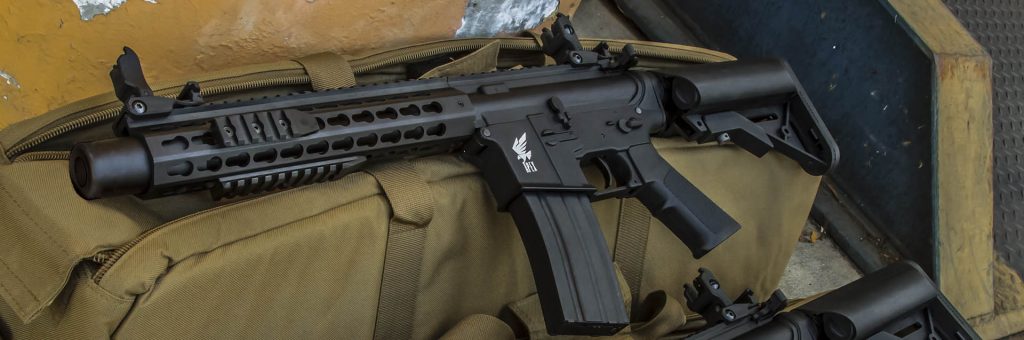
A competitively priced, high end AEG used to mean a $500 price tag and up with modification still needed to achieve the desired results. This was back when rail systems hadn’t fully caught on, however. Back when Airsoft in the U.S. was still fairly young. As time continued to press forward, we saw many companies rise to the demand of the players from around the globe and prices begin to get lower as components and capabilities began to sync up at an impressive level.
The Contenders:
There are many incredible brands out there that make fantastic high end AEGs. Some of note are Krytac, Elite Force, VFC, Classic Army, King Arms, Tokyo Marui, KWA, and G&G. As we have progressed, many of these lines have stepped up their game to put out as much technological advancement in to their series as possible. For now, we are going to cover three of these: Krytac, Elite Force, and Classic Army. (more…)
You don’t always need to go to fields to have a great time with airsoft or get an exciting game type. A lot of times you can get the same enjoyment from setting up private games with your friends wherever able. Especially for those of you who don’t have the necessary fields close by to deliver standing game play. I know that as much as we love our local fields, it isn’t always viable for us to get to them.
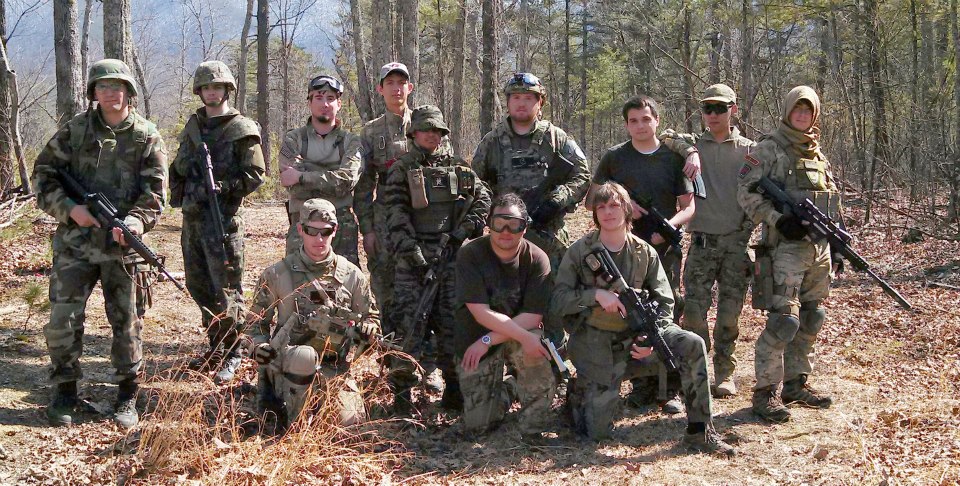
The old crew from the Airsoft Club at Virginia Tech
So in today’s blog post, and more blog posts to come, we will share game type ideas to help get more diversity in to your airsoft experience. This is a game type that I first played with my group of friends while studying in college and playing at a local area the National Parks service granted us to play on (as long as we informed them prior to our trips out).
Written by Virginia resident and son of Odin, Marcus “Thor” Olsson, is his After Action Report for Augusta Airsoft, LLC. A frequent player to Ballahack Airsoft in Chesapeake, Virginia, all-around great guy, and a pillar of the airsoft community for Virginia.
The owner at Augusta Airsoft sent me an invitation to come out and play at his field located in Stuarts Draft, VA several months ago. I was finally able to make it out there yesterday…Below is my review of my experience going to and playing airsoft at Augusta Airsoft, LLC. Along with some information about the field…
For those that use navigation equipment, just punch in 152 Johnson Drive, Stuarts Draft, VA and that will get you there. For me…I live in Hampton, VA so it was just under a three (3) hour drive for me. Convenience stores and gas stations are close by the field just up the main drive and within just a few miles of the field located on the main highway.
Information About the Field:
Hours of Operation are Saturdays from 12:30PM to 5:00PM and Tuesdays from 5:30PM to 7:30PM (Rain or Shine)
Admission is $20.00 on Saturday and $10.00 on Tuesday
Rentals are $10.00
I highly recommend anyone planning to go to Augusta Airsoft, LLC that you check out their website. There you will find their safety rules and requirements posted, as well as an electronic waiver that you must sign before you go out to the field. There is also other information so again check out their website before heading out there.
Hello Airsofters; Chris here from the GI Virginia store. In this post I wanted to run through a quick step-by-step about the proper way to paint your Airsoft guns, and things to both do and avoid if you decide to give your blaster a little extra personality. This first blog post will cover more or less just the basics of painting, mostly about what kind of paints to buy and how to go about the beginning process of laying a good base coat on your replica.
First and foremost, do understand that painting any part of your gun does generally void any warranties from manufacturers. I usually recommend waiting the 30-90 days for the warranty to run its course before I spray my gun. This ensures that if anything goes wrong with the gun right off the bat, you can get the issues taken care of as easily and seamlessly as possible. Also please keep in mind that removing or painting the orange tip of most guns also accomplishes the warranty being voided, so tread carefully or accept your fate before you get started.
Step One; Buying Paint
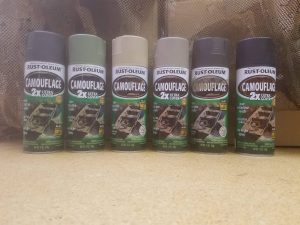
With that out of the way, let’s get down to the nitty-gritty. The biggest part of painting your rifle is selecting the right paint for what you need. If you want to do a more modern, military focused paint job, or really any paint scheme that doesn’t look like something from Stargate, you’re going to want to buy a very specific type of paint. Specifically, Krylon or Rustoleum Camouflage paints. Anything labeled Ultra-Flat is exactly what you’re looking for. The number of colors offered in these ultra flat finishes is limited, usually, to tans, greens, and browns. Keep that in mind when you do your shopping. PS; don’t forget to paint to your surroundings. Think about where you normally play and what kind of foliage and colors exist in that space when you buy your colors.
The full suite of Rustoleum Camouflage paints. These have always been my go-to.
The Pattern for Painting
Now, the most important decision you make will be what pattern you decide to put on your gun. Don’t forget that the end goal of any camouflage, either on your clothes or your gun, is to disrupt the outline of the shape. A gun is a very recognizable silhouette, so keep this in mind when you spray your patterns onto your blasters. Once you’ve decided on a pattern and color scheme, all that’s left is to gather materials, tape up what needs to be protected, and get it started.
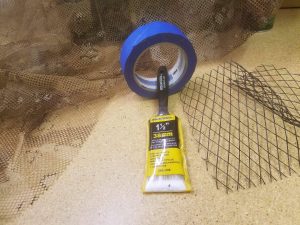
Painters tape, a brush or sponge, and some different sized mesh will help you along the way nicely. Camo netting, like the material on the left, can be purchased for cheap at most surplus stores. For larger mesh, I suggest finding laundry bags
Taping it off
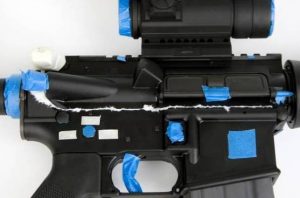
Taping up the gun is important, as the process will keep important areas of the gun protected and paint free. This includes any and all attachments you don’t want painted, including glass on optics, flashlights and lasers. Also keep in mind that the inner barrel of your gun needs to be stuffed and taped up at the end. I recommend just shoving some shop towel or paper towel into your muzzle to absorb and block the paint. Tape that down to ensure it doesn’t shift out of place.
After this, tape up your trigger, should you wish to do so, and tape up any trademarks you want to keep covered. Also remember to either insert a magazine into the gun to be painted simultaneously, or tape up the magazine well to protect your hop up unit, if you choose to leave your inner barrel installed during painting. Some people prefer to take out the gearbox of their gun to ensure no paint touches it, but realistically, as long as your dust cover is closed then you should be good to go without affecting performance.
A good example of some finished taping work
The Process for Painting
Some people prefer to hang their guns to produce a more consistent product from side to side on the gun. Laying the gun down on a flat surface, however, will do in a pinch. First up, decide on your base coat color, and apply a very light coat from about a foot away. Sweep the can from side to side while pulsing the button to release paint. Think about shooting the spray paint on semi automatic as opposed to full auto. Holding the button down and spraying the gun will result in thick, sticky paint that could potentially show runs. This will produce a pretty poor looking finished product.
Remember that this initial base coat isn’t really about coloring the gun; it’s more or less just giving the next few layers something to stick to as you go forward. After your base coat is applied to both sides and has been given time to dry, apply a second coat of the same color, going perhaps a tiny bit darker on this one in order to ensure your base color shows through the next couple layers you’ll be applying on top. Allow this coat to dry.
On the next blog, we’ll be talking about putting pattern on guns. Also, we will discuss what kind of materials to use to produce the effects that you want.